I ran into an issue moving an application from CF9 to Railo 4.2 with file names that use extended utf-8 characters, such as Banner_Küste.jpg for example. The extended characters weren’t being correctly interpreted, rendered as ��. Hence in any file operation, Railo couldn’t find them, and the application would error out. Railo was also unable to render these images because they were not being found on the file system.
Since I’m in Switzerland, and all my clients use extended characters, in French, German and Italian, I needed a solution. Telling them not to use extended characters in their file names wasn’t palatable. It seemed particularly odd to me that Railo didn’t play well here, since its primary developers are European.
Adjusting the Charset settings panel to ensure UTF-8 was used didn’t help, but I found a simple solution in a bug report that Michel Gallant filed that did the trick for me.
As per Michel comment in the bug report, I added the following line to the end of the tomcat setenv.sh script, which you will find at /tomcat/bin/setenv.sh :
1
export LC_CTYPE="en_US.UTF-8"
and then I restarted Railo to pick up the change. I was delighted it worked. Thanks very much Michel!
This server’s OS is Linux CentOS 7, and the above should work for any other Linux install as well. I’m not sure where this might be set on a Windows server, but it is the same file used to adjust the Tomcat/Java memory settings ( -Xms512m -Xmx1024m -XX:MaxPermSize=256m ).
Charlie Arehart has a now famous series of talks he presents titled “Hidden Gems in ColdFusion xx”. I’m not sure what the opposite of a “gem” is. For now, a turd will do. If someone has a better suggestion, let me know.
Hidden Turd in ColdFusion 11
I’ve recently moved a production application from CF9 to CF11. I didn’t catch all the compatibility issues in my testing, so users have been reporting minor bugs and I’ve been fixing them and the uploading them to the CF11 server as necessary. Yesterday, late in the afternoon, I uploaded a template with a very minor change to it and got a cannot find template error. Actually it was a cannot find component error. After repeated attempts to replace the file, and careful double checking (it was in the right place, I could find and read the file via the command line) to try and work around it, I changed another template. Now CF couldn’t find that one either. Huh???
The bigger problem was that it broke the application - it was no longer possible to login. #$%&@!!!!
Nothing I did for the next 6 hours helped. The template was obviously in the right location. It simply didn’t make any sense. I ran through permissions issues, hard disk failure issues, considered cloning the server, wondered how the fact that I had just installed SSL certs might have somehow caused CF to not find a template I had just changed, bizarre as that might seem, thought about updating the JVM or removing the certs from the java keystore, looked at permission issues again, checked and rechecked which user CF was running under, the group it was assigned to, considered whether the server had been hacked somehow, planned how I was going to roll back the entire application to CF9 and shift the data that had changed, thought about switching to Lucee and telling my clients they simply have to bear with me while I work through some compatibility issues. I had to get the server back up by this morning. My clients run their businesses with it. I tried yelling at the server through my monitor. “Bloody well just look, open your eyes, dammit!! It’s right there in front of your nose!!!” Didn’t help.
In the end, I got lucky with my Google foo and found someone else who has run into this issue. Turns out the problem was an option in ColdFusion administrator. The “Save class files” option was checked by default on install. I didn’t change any settings in the Caching section on install, assuming that the defaults would be “safe”, they would not cache anything in a way that would make the server “un-updateable”. I was wrong. The defaults can easily break your application, and leave you no clue at all as to why.
I needed to uncheck it, restart CF, and then the app worked again.
The text next to the checkbox says this:
When you select this option, the class files generated by ColdFusion are saved to disk for reuse after the server restarts. Adobe recommends this for production systems. During development, Adobe recommends that you do not select this option.
It should say:
When you select this option, any changes you make to your files may break your application. The error messages you will get will give you no clue at all what the underlying cause is - namely this checkbox enabling the poorly designed functionality behind it.
I expect options for production systems to make CF more performant, stable or secure. Options that potentially take production applications down with no warning, rhyme or reason are neither expected nor welcome. Given that I now am fully aware of the consequences of checking this box, I would recommend leaving it always unchecked. Otherwise, every time I need to make a minor change to a production server I have to remember to uncheck it, reboot the server, make my change, check it again, and perhaps reboot the server again. How does that improve the experience of my users? And if I somehow forget this arcane procedure, whatever it actually is, and take the app down again with a minor change, perhaps for hours and even days, it’s even worse!
Someone will invariably blame me. I should have known this - and remembered it. Well, maybe this blog post will help both me and perhaps others in this regard. That said, I think the fact that this option causes CF to break production applications is a bug. Feel free to vote for it if you agree.
Over the past few weeks I’ve installed and experimented with the Nginx webserver. At this point it seems to me there are some significant advantages to using Nginx over Apache, advantages that aren’t often highlighted, specifically when using either ColdFusion or Lucee as your application server.
First up, it was very easy to install, start, and enable so that it always starts at boot time. These are the commands I used for CentOS 7, adapt as necessary for your operating system:
I could then browse to the server ip and see the Nginx welcome page.
It then took me a bit of time for me to grok how the configuration setup works. However, compared to Apache’s massive conf file, the fact that I could easily see the entire main configuration in a single screen immediately put me at ease. Basically, Nginx has a main config file, located at /etc/nginx/nginx.conf on my CentOS install, which can be extended with includes. Before I started messing with it, the main conf file looked something like this:
123456789101112131415161718192021
user  nginx;
worker_processes  1;
error_log  /var/log/nginx/error.log warn;
pid        /var/run/nginx.pid;

events {
    worker_connections  1024;
}

http {
    include       /etc/nginx/mime.types;
    default_type  application/octet-stream;

    log_format  main  '$remote_addr - $remote_user [$time_local] "$request" '
                      '$status $body_bytes_sent "$http_referer" '
                      '"$http_user_agent" "$http_x_forwarded_for"';

    access_log  /var/log/nginx/access.log  main;

    include /etc/nginx/conf.d/*.conf;
}
… and the default site conf file, which is picked up by the include at the bottom of the main conf file above, looked like this:
server {
    listen       80;
    server_name  localhost;

    #charset koi8-r;
    #access_log  /var/log/nginx/log/host.access.log  main;

    location / {
        root   /usr/share/nginx/html;
        index  index.html index.htm;
    }

    #error_page  404              /404.html;

    # redirect server error pages to the static page /50x.html
    #
    error_page   500 502 503 504  /50x.html;
    location = /50x.html {
        root   /usr/share/nginx/html;
    }

    # proxy the PHP scripts to Apache listening on 127.0.0.1:80
    #
    #location ~ \.php$ {
    #    proxy_pass   http://127.0.0.1;
    #}

    # pass the PHP scripts to FastCGI server listening on 127.0.0.1:9000
    #
    #location ~ \.php$ {
    #    root           html;
    #    fastcgi_pass   127.0.0.1:9000;
    #    fastcgi_index  index.php;
    #    fastcgi_param  SCRIPT_FILENAME  /scripts$fastcgi_script_name;
    #    include        fastcgi_params;
    #}

    # deny access to .htaccess files, if Apache's document root
    # concurs with nginx's one
    #
    #location ~ /\.ht {
    #    deny  all;
    #}
}
Note the asterik syntax in the include at the bottom of the main conf file:
include /etc/nginx/conf.d/*.conf;.
Effectively, any .conf file you drop in that directory becomes part of the configuration ( specifically of the http{} block ).
Note also that there are semicolons at the end of every setting. If you see errors when reloading conf files using the command nginx -s reload, look for missing semicolons.
In a nutshell, Nginx’s configuration is a simple nested structure, like this:
nginx global settings

events {

}

http {

  server {
      listen 80;   # port to listen on
      server_name domain.com *.domain.com domain.net *.domain.net;
      root /var/www/domain;  #absolute path to root directory of website files

      location /downloads {
          # specific settings for a file system location relative to the root
          # which in this example would be /var/www/domain/downloads
      }

      location ~* \.(?:ico|css|js|gif|jpe?g|png)$ {
          # specific settings for files ending in suffixes .ico, .css, .js, gif, etc
          # defined using a regex, under the root directory defined in the server block
      }

      location / {
          # general settings for all files under/var/www/domain in this example
          # in this example only for those files that do not match the more specific location directives above
      }

      location = / {
          # this directive is triggered when only the domain is specified in the url
          # in this example for the url http://example.com
      }

  }

  server {
      # configuration for another virtual server,
      # defined by a unique server_name or listen directive
  }

}
Each server block defines a virtual server, similar to a virtual host in Apache. The server_name directive takes a space delimited list of domains, which can include an asterisk as a wildcard character, replacing the first or last part of a name, to specify for instance any subdomain or TLD. Note that a directive like server_name example.com *.example.com can be also written with the shorthand expression server_name .example.com
Nginx selects and processes locations within a server block using the most specific match, with regexes taking precedence, followed by the longest matching prefix. So in the above example, Nginx would process a file named myImage.jpg using the second location directive, a file in the downloads directory named myInfo.pdf using the first location directive, a file named index.htm ( or index.cfm ) using the third location directive, and a request to the root of the domain, say to http://domain.com/, with the last location directive, where the addition of the “=” sign specifies an exact match.
To use Nginx with either ColdFusion or Lucee, the proxy_pass directive is used, as in the following example:
1234567891011121314151617181920
server {
  listen 80;   # port to listen on
  server_name domain.com *.domain.com domain.net *.domain.net;
  root /var/www/domain;  #absolute path to root directory of website files

  location /downloads {
      # specific settings for a file system location relative to the root
      # which in this example would be /var/www/domain/downloads
  }

  location ~* \.(?:ico|css|js|gif|jpe?g|png)$ {
      # specific settings for files ending in suffixes .ico, .css, .js, gif, etc
      # defined using a regex, under the root defined in the server block
  }

  location / {
      proxy_pass  http://127.0.0.1:8500/domain/;
  }

}
In the above example, Nginx passes the request to ColdFusion, running on the same server, via port 8500. It gets the response back from CF, immediately terminates the connection to CF so it is available to handle the next request, and then serves the static files using the settings in the second location directive, along with the rendered html from ColdFusion to the user that made the request. Note that this configuration assumes that you’ve changed the location of the CF webroot.
The first advantage here is that there is no connector needed between ACF or Lucee and the webserver. We don’t need to install a connector as part of the initial server setup, and we avoid any bugs or configuration problems that might crop up with these connectors. We also avoid the necessity to sometimes manually reinstall connectors when updating ACF/Lucee. All that is needed is to add the proxy_pass directive and reload the configuration using nginx -s reload.
The second advantage is that as long as you have a firewall in place that only allows public access via ports 80, ( plus maybe port 443, and whatever port you are using for ssh access), your ACF or Lucee server is secured, simply because without a connector between the webserver and your application server, there is no direct access via port 80 or port 443 to your application server. In our example above, anyone browsing to domain.com/CFIDE/administrator/ will get a 404 error. The CFIDE directory isn’t in the root specified. Port 8500 is closed, so ip:8500/CFIDE/administrator/ won’t return a response. The ACF admin directory is not contained in the default site Nginx root, so ip:/CFIDE/administrator/, for instance, will simply return a 404.
How do you gain access to the admin areas of ColdFusion or Lucee on a remote server if ports 8500 or port 8888 are closed? Simple. Use SSH Tunneling.
In the event that the CFIDE, WEB-INF, or lucee-context directories are exposed through a particular configuration setup in a particular server block, there is a simple way to handle this using location directives that can be set globally or included in each server block necessary, for example:
Very few developers spend significant time configuring servers. Hence, it often may happen that the servers we maintain for our clients are not as secure as they could be. The simplicity with which we can secure a ColdFusion server behind Nginx seems a definite advantage.
However, the biggest advantage, to me, seems to be the ease of configuring strong SSL https security on Nginx. Because Nginx uses a reverse proxy setup, Nginx can be configured to handle the https connection with the requestor in isolation. What this implies is that SSL certificates do not need to be imported into the Java keystore. Nor do your SSL certs need to be reimported every time the JVM is updated. Of course, if you require a very secure setup, in a load balanced configuration to multiple application servers, you might need to ensure an SSL connection between Nginx and ColdFusion / Lucee. But if, for instance, Nginx and ColdFusion / Lucee are located on the same server, or you trust the internal network, this would not be necessary.
Following this excellent guide by Remy van Elst, I was able to relatively easily setup SSL for a web application to an A+ level as graded by Qualys SSL Labs. Here’s what the SSL portion of my Nginx configuration looks like:
Note that I’ve reduced the max-age value of the add_header Strict-Transport-Security directive to four days from what Remy has recommended, over uncertainty how this will play out when certificates are updated. I understand that this directive will force user agents to use https for the duration of the value set. Note that it will be updated into the future every time the header is sent to the browser.
There are 3 aspects of this configuration that require a bit of extra work on your part, besides simply copying, pasting and adjusting the above example. One is that if your SSL certificate provider has also issued intermediate and root certificates, you will need to concatenate these into one file. Your domain certificate must come first, followed by the intermediate certificates, and finally the root certificate at the end. The easiest way to do this is to create a blank text file, and copy and paste the contents of the certificates into it. Save it and upload it to the chosen location on your server, along with the private key. Point to the location of the concatenated cert in the Nginx config file using the ssl_certificate directive. Point to the location of the private key using the ssl_certificate_key directive.
On Linux, you should secure the key by running chmod 600 on the ssl directory that contains the certificate files and chmod 400 on the private key file itself.
To generate the file referred to in the ssl_dhparam directive in the above example, it is necessary to cd to your ssl certs directory and run the following command, as explained in Remy’s guide in the Forward Secrecy & Diffie Hellman Ephemeral Parameters section:
12
cd /etc/ssl/certs
openssl dhparam -out dhparam.pem 4096
You will be warned that “this will take awhile”. Remy doesn’t mention this, but be prepared for it to take a relatively long time, perhaps an hour or so.
Once you have ssl configured and working, you probably want to redirect any traffic trying to access the site via insecure http to secure https. Here’s how to configure that:
12345
server {
  server_name  domain.com;
  listen  80;
  return  301 https://$server_name$request_uri;
}
I already mentioned what I think is the biggest advantage, the ease with which one can configure SSL. However, there is one other advantage I’d like to mention that may trump that, the ability to easily configure Nginx for both load balancing and hot swapping of application servers. Here’s how to do that using the upstream directive:
12345678910111213
upstream    cf_servers {
  #ip_hash;                   ## uncomment ip_hash for load balancing
  server          127.0.0.1:8500;
  #server         192.168.0.20:8500;  ## add more application servers for load balancing
  keepalive       32;         ## number of upstream connections to keep alive
}

upstream    lucee_servers {
  #ip_hash;                   ## uncomment ip_hash for load balancing
  server          127.0.0.1:8888;
  #server         192.168.0.30:8888;  ## add more application servers for load balancing
  keepalive       32;         ## number of upstream connections to keep alive
}
Then instead of using the localhost IP address in your proxy_pass directive, use the upstream server name instead, like so:
If you get caught in a bind and can’t use ColdFusion for some reason, then hot swapping an application over to Lucee is as simply as changing the above to this:
Or if you find one of your web properties suddenly inundated with traffic, using the upstream directive, your webserver is already set up for load balancing. You’d simply need to clone a few servers, boot them up, and add them to the upsteam directive. The ip_hash directive is a way to enable sticky sessions, to ensure a visitor is always routed to the same server.
A few more configuration options and details should be mentioned.
One is that it is also possible, and perhaps preferable, to configure the path to a website’s files within Tomcat’s server.xml file, rather than specifying it in the Nginx proxy_pass directive.
With the path to the website’s files configured in server.xml, the path to the website’s files is not appended to the proxy_pass directive, so it would look like this:
1234567891011121314
server {
  listen 80;
  server_name .domain.com;
  root /var/www/domain;

  location ~* \.(?:ico|css|js|gif|jpe?g|png)$ {
      # specific settings for files ending in suffixes .ico, .css, .js, gif, etc
  }

  location / {
      proxy_pass  http://lucee_servers/;
  }

}
For this to work, Nginx needs to pass the host name to the app server used, either Lucee or ColdFusion. Your application may also require this information. Here is a suggested set of directives to accomplish this:
… which could be placed in a separate conf file and included with each proxy_pass directive, like so:
1234
location / {
  proxy_pass  http://lucee_servers/;
  include     /var/inc/nginx-cf-proxy-settings.conf;
}
If you are using Lucee, adding a host configuration block to server.xml will cause Lucee to create a WEB-INF directory under the docBase path specified along with an additional context. You’d then want to block public access to that directory in some way as I’ve explained above.
You can also use a regex to ensure you only pass CFML templates to Lucee or ColdFusion, as the following example demonstrates:
1234
location ~ \.(cfm|cfml|cfc)$ {
  proxy_pass  http://lucee_servers/;
  include     /var/inc/nginx-cf-proxy-settings.conf;
}
You can put whatever file extensions you’d like Lucee / ACF to process in the pipe delimited list within the regex, so ~ \.(cfm|cfml|cfc)$ or ~ \.(cfm|cfml|htm|html)$ could be used, for example.
A couple of small gotcha’s I ran into setting the path to the website’s files in the proxy_pass directive. One is that directories with dots in them can confuse mappings. The solution I used was to remove the dots from directory names and use hyphens instead ( my-domain-com ). I also had trouble with redirects in FW/1, since they rely on the value of cgi.script_name. The simple solution was to change the baseURL parameter of FW/1’s config to baseURL = '' from the default baseURL = 'useCgiScriptName'. Problems such as these might be avoided by using the server.xml configuration option.
I have 2 production servers running Nginx at the moment, one ACF and one Lucee server, and so far it seems to be working very well. I’m particularly happy with the choice because Nginx has a very small memory footprint, which leaves more memory available for the JVM, which indeed yet another advantage.
I’m in the process of preparing a server to test CF11 with nginx as the front end webserver. Since nginx will act as a reverse proxy for any files that need to be processed by CF, essentially .cfm files, and serve any other assets directly, images, css and js files, etc, I want to relocate the ColdFusion webroot to a directory outside of the cf installation directories. A little googling led me to a old blog post that outlined the process in sufficient detail that I got it working on the first shot. Thanks Ryan! This post is both to refresh the collective knowledge cache and affirm that the technique works on CF11 as well as CF10.
The first step is to locate the server.xml file, which you will find at
/cfusion/runtime/conf/server.xml
Make a backup of it. If something goes wrong, you can use the backup to restore CF to a working state again. Note that CF needs to be able to locate the CFIDE and WEB-INF directories to function properly, and these are both located with in the default webroot location. So make a backup of server.xml before proceeding.
Open server.xml for editing, scroll down to the bottom of the file where you should find the following line commented out:
Assuming the installation directory is /opt/cf11, so that I can give a concrete example, uncomment that line and adapt it to the following model, which is working on my CF11 installation:
The docBase is the new webroot location, which must already exist, but can be of your choice. WorkDir points to an existing location in the installation directories. The aliases are essential, so that CF can find the CFIDE and WEB-INF directories. Adjust the slant of the slashes depending on your operating system, Windows or Linux. Use absolute paths for these settings, so on a Windows server, they would likely begin with a drive letter.
After you’ve edited and saved server.xml, restart ColdFusion, place some cf code in the docBase directory, and browse to it via localhost:8500/ to make sure it works. Also check if you can still access the CF admin panel at localhost:8500/CFIDE/administrator/, which CF should find via the aliases= declaration. If both those tests succeed, you should be good to go!
New with CentOS 7 is firewalld, a replacement for iptables to manage the firewall. As with anything new, at first glance it seems confusing, but I’m finding I prefer it over iptables.
The first thing to understand about firewalld is that it is has multiple layers. It comes with a predefined set of zones, namely block, dmz, drop, external, home, internal, public, trusted, and work. Each of those zones can be associated with a network device or one or more ip addresses. Essentially, zones define and demarcate the level of trust an admin has decided to place on the devices and traffic within a network.
firewalld also pre-defines a set of services that can be added or removed from a zone. Effectively, when a service is added to a zone, it opens a port and sets any other necessary parameters. Services are defined with XML. Here’s what the http service looks like:
123456
<?xml version="1.0" encoding="utf-8"?>
<service>
  <short>WWW (HTTP)</short>
  <description>HTTP is the protocol used to serve Web pages. If you plan to make your Web server publicly available, enable this option. ... </description>
  <port protocol="tcp" port="80"/>
</service>
So to open port 80 via the tcp protocol to serve http requests, as an example, first a zone must be associated with the network device that will handle the traffic, and then the http service added to the zone. As an admin, you can define your own custom services, or customize existing services. Other techniques allow you to open a port directly on a zone, or define more complex rules for access.
To configure the firewall and check its status, a command line client is provided, firewall-cmd. It can be used to make both permanent and temporary config changes. The configuration for firewalld is stored in XML files in /usr/lib/firewalld/ ( the default settings, not to be modified! ) and /etc/firewalld/ ( for user configured settings, which have preference over those in the default location ). These files can be edited, backed up, or used as templates for other server installations.
Now that we have an overview, we can get to work. To check if firewalld is running:
1
systemctl status firewalld
If you see from the output that firewalld is not running, or you see that the loaded service is disabled, here are the commands needed:
Now I want to configure the firewall. First, I check for the name of the ethernet interface so that I can refer to it to associate it with a zone:
1
nmcli dev status
Then I check which zone eno16777736 is currently assigned to:
1
firewall-cmd --get-zone-of-interface=eno16777736
The result is “no zone”, so the next step is to add the ethernet interface to the public zone, which is the zone I’ve decided to use for http access to the server. It’s important to add the –permanent flag to the command so it is retained permanently, across reboots:
Now I have to reload the firewall configuration for the changes to take effect:
1
firewall-cmd --reload
And then we can double check just to make sure the ethernet interface is now added to the public zone …
1
firewall-cmd --get-zone-of-interface=eno16777736
and the result is “public”, so that’s now set up correctly.
Let’s now check how the public zone is currently set up:
1
firewall-cmd --zone=public --list-all
Here we see again that the ethernet interface is added to the public zone, and that it is both active and the default zone. By default after installing CentOS 7, we have the services dhcpv6-client and ssh added to this zone. Taking a quick look at the description for this service to see what it does by opening /usr/lib/firewalld/services/dhcpv6-client.xml, we see, “This option allows a DHCP for IPv6 (DHCPv6) client to obtain addresses and other IPv6 settings from DHCPv6 server.” We won’t be using IPv6 addresses within our local network to access this machine, so I think it’s safe to remove this service, although we may want to leave it in place on a production server:
And adding the http service back to the public zone again allows the Welcome to nginx! page to be loaded in my browser. Perfect.
However, I still don’t have access to the CF Admin panel at http://192.168.1.16:8500/CFIDE/administrator/index.cfm, because that’s over port 8500. On a production machine, I absolutely would not open port 8500 for this purpose. But since this server is on our local office network, let’s see how we can do this.
The first option that comes to mind is to create a custom firewalld service specifically for this purpose. Documentation I’ve read recommends using existing services as a template. Custom services go in /etc/firewalld/services/. First let’s make a copy of the http service, calling it http8500, and place it in /etc/firewalld/services/:
And now http://192.168.1.16:8500/CFIDE/administrator/index.cfm works! Again, this is not how I’d set up access to the CF administrator on a production machine, but it was an opportunity to experiment with creating custom services. What I like about this option is that I can enable or disable it, independently of the other services enabled. So if I decide I want to lock this server down, I can quickly remove the http8500 service and access the CF Administrator via SSH Tunnelling.
What I usually do is move ssh access to an obscure port. I think we can easily accomplish this using a custom service, but before I do that, I want to take a look at how the localhost interface is set up within the firewall. Again, we use nmcli dev status to get the name of the localhost or loopback interface
1
nmcli dev status
It’s “lo”, so let’s see if it’s set to zone by default:
1
firewall-cmd --get-zone-of-interface=lo
Nope, the result I get is “no zone”. Let’s also see if there are any services added to the trusted zone, which would be the most appropriate for localhost
1
firewall-cmd --zone=trusted --list-all
At this point, nothing is added to this zone, no interfaces, services, sources or ports, etc. And the network interface “lo” isn’t associated with any zone.
Now what I want to see is how the server responds to localhost access with the firewall enabled. This might be important on a production server because I will use ssh tunneling to access any areas I will restrict from public access. So let’s logout from the server and login again with the -D flag so that I can tunnel into the test server and test if I have access via localhost with the firewall setup as it is now:
I keep Firefox on my dev machine reserved and set up for ssh tunneling on port 6100, so I simply open Firefox and browse to http://localhost:8500/CFIDE/administrator/index.cfm, and find I can access the CF11 admin page and login. Browsing to http://localhost/, I see the Welcome to nginx! page. So at this point via localhost, I have access. ( Note for anyone without experience using ssh tunnelling, when I use localhost on Firefox set up for ssh tunneling, logged to the CentOS server using the -D flag, I am browsing the CentOS server next to me, not my dev machine. See SSH Tunnelling for details how to do this. )
Now what happens if I add the “lo” network interface to the trusted zone, where no access is currently set up?
Adding the “lo” interface to the trusted zone with no services had no affect at all on tunnelled access to localhost. So it looks like the firewall doesn’t interfere there. So to clean up, I will remove the “lo” interface from the trusted zone and call it a day.
PS - For some reason, “lo” was not removed from the trusted zone according to firewall-cmd –zone=trusted –list-all unless and until I rebooted the server. The strange thing was that the config file was correctly altered, but somehow, firewalld didn’t seem to pick up the change. Perhaps this is the intended behavior, to prevent lockout during a current session, but I’ll look into filing a bug report later this evening … ( which I have now filed here ).
I’ve been wondering how to best set up a local testing environment for some time. My production servers are all on CentOS. On the advice of Nolan Erck, whom I met at CFCamp this year, I’ve decided to use VMWare to set up a CentOS server on a virtual machine here in the office. This approach allows me to have multiple test environments, and I can easily move them to another machine if needed simply by copying the disk image.
For ease of access, each VM needs a static ip on the local network. It’s not hard to do once you figure it out, but getting all the pieces in place took some hours of digging, trial and error. This post, while specific to VMWare and CentOS 7, is intended to help both my future self and anyone else set up networking quickly and easily in such a scenario. Adapt as necessary for your specific environment.
The obvious first step was to download the ISO image from a CentOS mirror site. I grabbed the minimal install as a nearest approximation to a production environment, and created a VM from it using VMWare on an unused Mac mini we had laying around the office.
On the minimal install, networking isn’t enabled by default. So before I could proceed, I had to figure how to enable networking, and get it working via a static IP. Here’s a summary of what finally worked for me.
1) Figure out what the ethernet device is named by running the command :
1
nmcli dev status
As you can see, mine was named eno16777736, which is not the RedHat default you may find in many examples online.
2) cd to the directory /etc/sysconfig/network-scripts and run ls to display its files
12
cd /etc/sysconfig/network-scripts
ls
3) Look for the configuration file for your ethernet device, mine was named ifcfg-eno16777736 and open it for editing using vm or nano
1
nano ifcfg-eno16777736
The above screenshot was taken after it was edited. The lines to change or add are:
123456
BOOTPROTO=static
IPADDR=<the static ip address you want to assign to this instance>
NETMASK=255.255.255.0
GATEWAY=<the gateway ip address of your internal network>
NM_CONTROLLED=no
ONBOOT=yes
I found that adding the correct gateway ip was essential. NM_CONTROLLED specifies whether or not this device is controlled by the Network Manager. We are setting the parameters manually here, so this must be no. ONBOOT=yes specifies to connect this network device on boot.
Save the file, exit nano, and run the following command to restart the network:
1
systemctl restart network
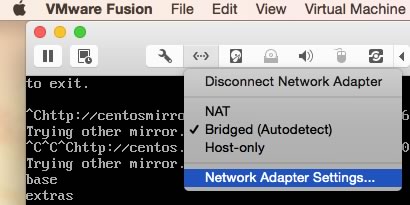
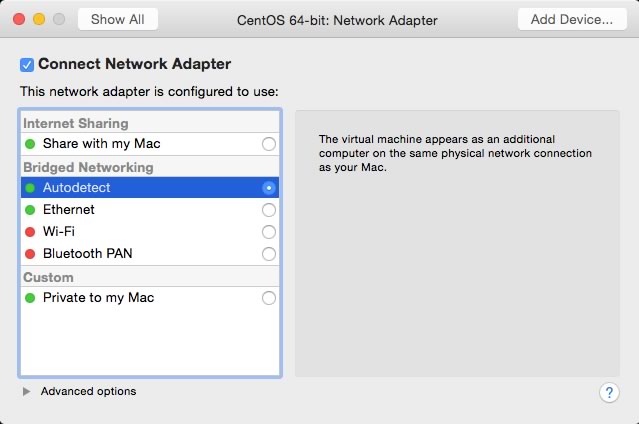
Now CentOS 7 should be setup to network via the static local ip of your choice. But the connection isn’t bridged outside of the VM. After some fiddling around, here’s what worked for me. I went out to the VMWare interface, clicked on the double arrow icon to open the networking menu, and clicked Network Adapter Settings…
From the menu, I chose Autodetect, as shown below:
Once I had these configuration changes in place, I could access the CentOS instance via SSH and SFTP from my dev machine.
By the way, from my reading, it also seems possible to use the Network Manager to achieve the same end. In this case, you’d leave the config file for your network device alone, and instead run the nmtui command. Search Google for more complete instructions. You’ll still need to bridge the connection through VMWare tho’.
Hope this helps somebody.
PS - If you can access the instance via SSH or SFTP, but cannot from a browser, you may need to either disable and stop firewalld:
The ColdFusion and Lucee Lockdown Guides recommend that access is restricted to all administrative areas of the server. This is especially important to do because many security vulnerabilities have been discovered that exploit open access to admin directories. It is fairly easy to accomplish, using a directive in the Apache configuration for example. It would look something like this on ACF:
1234
<Location /CFIDE>
  Order Deny,Allow
  Deny from All
</Location>
or this on Lucee:
1234
<Location /lucee-context>
  Order Deny,Allow
  Deny from all
</Location>
So far so good, but now anyone needing to administer the server can’t login. They will be denied access by the web server. There are various recommendations for allowing only selective access, for instance from a given fixed IP address at the office of the administrator:
12345
<Location /lucee-context>
  Order Deny,Allow
  Deny from all
  Allow from 84.16.156.99
</Location>
But what if the server administrator(s) is/are out of the office when they need access to the server? Away at a conference, at a client’s office, or at home? And what if your office doesn’t have a fixed IP address? Should you get one … and then have to remember to change the “allow from” IP address in all of your server configuration files if and when that IP address changes? For a variety of reasons, this doesn’t seem ideal.
There’s another “small” problem here. Best security practice dictates that all access to admin areas should be over an encrypted connection. I cannot ensure that the modem installed here in my office, or wherever else I happen to be when needing to admin my servers, a hotel for instance, is not compromised by a packet sniffer. In fact, I recently installed an update on our modem here specifically for a packet sniffing vulnerability, and I only ran across it by chance. No idea how long that remained unpatched, and I’m simply not prepared to invest the time to learn how to monitor this sort of thing. This implies that I definitely should install SSL certificates and set up secure https access for all administrative areas on each server I maintain. That’s painful.
Put all that together, and it helps to explain why ACF and Lucee servers are often not locked down.
Here’s where SSH tunneling comes to the rescue. In a nutshell, it allows you to securely browse a remote server as localhost, as if the server was under your desk and your keyboard and monitor where connected to it, even if it’s located halfway around the world. The icing on the cake is it is very simple to set up, and the same setup will work for every server you admin!
To use SSH tunneling to gain access to admin areas of your server, the first step to restrict access to any admin area to only localhost, for example:
For ACF:
12345
<Location /CFIDE>
  Order Deny,Allow
  Deny from All
  Allow from localhost
</Location>
or for Lucee:
12345
<Location /lucee-context>
  Order Deny,Allow
  Deny from all
  Allow from localhost
</Location>
( While you are at it, restrict port access to only those ports you need to leave exposed, for instance 80, 443 and whatever port you are using for SSH access ).
There are detailed instructions for SSH tunneling all over the web if you want to find out more, but the instructions below should work fine for our purposes.
In your web browser, configure the proxy settings to point to “localhost”, a free port on your local machine (we’ll use 60001), using SOCKS5. This should work with any browser. Using Firefox as an example, here’s how to do that:
Go to Preferences
Click the Advanced icon
Click the Network tab
Click the Settings button, across from where it says “Configure how Firefox connects to the Internet
Select Manual proxy configuration
In the SOCKS Host field put “localhost” without the quotation marks
In the Port field put the port number you will use, 60001 in our example
Select SOCKS v5
Click OK
ssh into any server you admin using Terminal or Putty, etc. Use the -D flag set to the same port as above, example: ssh -D 60001 user@102.103.108.39
You can now access admin areas of the server in this browser using localhost urls such as http://127.0.0.1/CFIDE/administrator/enter.cfm, as long as you remain logged in via SSH. The connection is through an SSH “tunnel”, so between your local machine and the server, all traffic is encypted.
Note that the port chosen is arbitrary. It only has to be available and match in both the -D flag and SOCKS port setting. To revert the browser to normal behavior, simply choose No Proxy in the Network Settings dialog.
What I usually do is leave Firefox configured in this way and reserve it only for SSH tunnelling sessions. And again, once a browser is configured with these proxy settings, you can securely browse any server as localhost by SSH’ing into it with the -D port setting.
Now say you have Fusion Reactor installed and want to ensure access is also restricted. Just leave your firewall configured to leave the ports Fusion Reactor uses closed, and access it, securely, via your SSH tunnel!
Thanks to David Stockton, who until recently worked with the fusion reactor team, for sharing this tip with me.
IMPORTANT NOTE: If you have difficulty logging in, or maintaining a login, particularly to the ACF admin panel, clear the cookies in the browser you are using for SSH tunneling and try again.
In my case, I ran into this after using this technique to manage multiple instance of ACF, particularly on ACF 11. I could log in to the admin panel successfully, but if I tried to modify anything, set a datasource for instance, I was logged out and the action did not complete. The error log contained the message “There was an error while verifying the token. Either the session timed out or un-authenticated access is suspected.”
A few days ago, Adobe released updates for CF 9, 10 and 11. I’ve been following comments raised about them since, and I’m disturbed to see some developers struggling to get their servers patched, especially when applying the update has taken the server down. I don’t know if these cases are isolated or might be more widespread, but I find this unacceptable.
I run several instances of ACF on CentOS. I’m subscribed to the CentOS-announce Digest mailing list, as I’m sure most CentOS server admins are. For many years now, whenever an update is released, perhaps once or twice a week, I ssh directly onto our servers, run yum update, and generally within less than a minute, the update completes. Never once has the process failed. Never once have I seen an incoming email on the CentOS mailing list that someone experienced a server crash, or any other issue for that matter, because of an update.
This is how ColdFusion updates should function, flawlessly.
In stark contrast, CF developers have become wary of applying updates. There is a risk that their server will compromised because of the security vulnerability the update is meant to patch, and there seems to be an equal if not greater risk that their server will be compromised, in one way or another, in the update process. CF 10 introduced automated updates, but as we see, the automated update process remains error prone.
It should not be like this. Rather than focusing on new features, the CF dev team needs to focus on getting the update process as flawless as it is on CentOS. What they seem to have lost track of is that, for a start, developers have families to support. Our clients expect us to keep their servers up and running 24/7. Our clients depend on the applications we build to run their businesses. As developers, we cannot afford to experiment on our clients. And yet, when Adobe releases a flawed update that takes servers down, effectively experimenting on us and our clients, oh, look, they are trapped between a security vulerability and a flawed update, the implicit statement received on our end is “We don’t care if you keep your clients. It does not matter to us at all.” Really?
What is even more disturbing is the way the Adobe dev team now uses us as their QA department, as if ColdFusion server was loosely organized open source project among wannabe hackers. It is not disturbing because the CF devs are actively reaching out trying to solve problems that are occurring, asking for logs, error message screenshots, suggesting the possible need to copy and paste jar files from here to there if some functionality is broken, instructing us to manually install the updates one at a time if the automated updater doesn’t work, etc. It is because these interchanges should never occur in the first place regarding an update. The update process needs to be flawless, as near to it as possible, so that we can rely on it. Like it is on CentOS. If they can do it, the CF dev team can do it.
The worst, however, is this, linked for reference but replicated below, an Adobe engineer asking a developer, a paying customer, to effectively crash his server “in off peak hours” so that he can get at the log files that might reveal what the problem is.
Hi Mark,
Of all the things connector logs with debug_level=debug are the most important one’s. Till now with all the information you have shared I can tell that there is some problem with shared memory access between worker threads. But to exactly pin point the problem I will be needing the connector logs. I understand it will be difficult for you to do something on production server but it is a must for this problem to be resolved.
If possible in off-peak hours, apply the update14 and reconfigure the connector. Once the connector is installed go to connector directory c:\coldfusion10\config\wsconfig\magicnumber\ and open isapi_redirect.properties in notepad. Edit the line “log_level= info” and change it to “log_level= debug” and save the changes. Restart IIS, hit any cfm page and wait for app pool to crash. Once it is crashed take a backup of isapi_redirect.log(created in connector directory) in some other directory like c:\connector_logs\ directory. After the backup you can revert back the changes. Lastly you have to share this backed up logs with us.
Thanks, Milan.
When I say this is unacceptable, I mean that it is not acceptable for Adobe to use CF developers and their clients as their QA team, especially in that Milan says “I understand it will be difficult for you to do something on production server but it is a must for this problem to be resolved.” No, it is not a must to take down our servers, possibly endangering our client relationships, to fix your bugs.
Yes, this is very complex stuff. But in today’s world, that simply means Adobe needs to employ a vastly improved QA strategy than the one they have in place today for ColdFusion releases, especially for the update process itself.
I’m working on a business application that generates invoices and pay slips for a company in Switzerland. Instead of checks, the Swiss banking system uses a pay slip, and these have an account number, a reference number and of course the total which should be paid, all with check digits, similar to what is found on credit card numbers. At first I thought the check digit was generated by the Luhn algorithm, for which I could find plentiful examples, even in ColdFusion, such as Dan Vega’s post explaining how to generate credit card numbers with correct check digits. The meat of his implementation is here, which expects an array, ccnumber, with the card number in it and and cclen, which is of course arrayLen( ccnumber )
12345678910111213141516171819
<cfscript>/* the luhn Algorithm is used to create the check digit number */varsum=0;for(j=1;j<cclen;j++){vardigit=ccnumber[j];// length of 16 for Visa|Mastercard|Discover && length of 15 for Amexif((cclen==16&&j%2!=0)||(cclen==15&&j%2==0)){digit=digit*2;if(digit>9){digit=(left(digit,1)+right(digit,1));}else{digit=digit;}}sum+=digit;}varcheck_digit=[0,9,8,7,6,5,4,3,2,1];ccnumber[cclen]=check_digit[(sum%10+1)];</cfscript>
I was hoping I could quickly adapt the above for my use case. However, I was disappointed to learn that Swiss pay slips use a non-standard algorithm to calculculate check digits. And genuinely disheartened when I was left staring at this explanation of the algorithm, the only one that seems to be provided by the banking sector.
If you study it for a few minutes, you’ll see how the check digit is calculated, using the chart provided. But it doesn’t give much of a clue what algorithm should be used to generate the check digit, except in the title, which seems to suggest it might use mod 10, recursively, if you assume that it has been translated from German incorrectly, module instead of modulo or modulus.
After a few sessions of Googling, I found an example someone wrote in Delphi that seemed to demonstate it could be tackled rather simply, with a single array representing the entire chart. Unfortunately I couldn’t grok some of the nuances of the syntax.
Then I ran across another set of examples variations of C and Visual Basic. His comment at the top of the page reads:
Haben Sie sich auch schon über die nicht sehr programmiergerechte Beschreibung in den Unterlagen der PostFinance und der Telekurs geärgert? … which my Swiss client on this project translated as “The descriptions from PostFinance and Telekurs are shit…” - not at all useful for programmers.
The VB example looked familiar enough, and after a bit of mucking around, came up with this CFML function that seems to work to generate the check digit, passing every test I’ve thown at it from the pay slips I have laying around.
If you compare the VB solution with the above, you’ll see I’m adding 1 to each calculated index value. That’s because ColdFusion arrays are 1-based rather than 0-based. If you happen to be using this example to build a similar function in another language that has 0 based arrays, remove the + 1 from line 7.
This function expects a string with consecutive numeric digits 0-9 only. It will blow up if any other characters are passed into it.
Here are some reference links for solving the more general problem of generating Swiss payment slips: